Introduction
Learn how to clean hiking boots – If you’re a hiker, then you know the importance of keeping your hiking boots clean. Not only do they perform better when they’re clean, but they’re also safer to wear.
If you’re an avid hiker or backpacker, then you know that a good pair of hiking boots is essential to a successful and enjoyable trip. Not only do they provide much-needed support and traction on rough terrain, but they also keep your feet dry and comfortable during long days spent on the trail.
In this article, we’ll show you how to clean your hiking boots using five easy steps. So if your boots need a good cleaning, read on!

Step 1. Preparation
But as any experienced hiker knows, hiking boots don’t come cheap. A good pair can easily set you back $100 or more, so it’s important to take care of them so they last. With proper care and maintenance, your hiking boots will be with you for many adventures to come.
Here’s how to prepare to clean your hiking boots for a long life of use.
- Get a tub or basin or a clean place outside
- Grab a small bucket with warm water and non-abrasive soap
- Pick up a soft bristle cleaning brush at the store or use an old toothbrush
- one to two absorbent towels.
Step 2. Cleaning the outside of your boots.
When understanding how to clean hiking boots, you typically start with cleaning the outside of the boots. Take care to remove the laces at least every other cleaning to be able to reach the tongue part of the boot and possibly the insole if it is removeable.
The exterior is made of various fabrics of different layers typically to make the boot waterproof and sturdy yet flexible. Most are made of a gortex material but some are made of leather or a combination of leather, rubber, and gortex fabrics. Using the soft bristle brush, dip the brush in the mild detergent water and softly run it across the boots exterior.
Take care not to be too harsh on the fabric as it could damage the material and/or the waterproof properties. Once you have taken the brush to the outside of the boots, you can use plain water or damp towel to wipe off the soap residue as that too could potentially damage the fabric or waterproof properties.
Step. 3 Cleaning the inside of your boots.
When cleaning the inside of your hiking boots, you’re going to need the same materials you had for the exterior, however, you might need some smaller brush items to get into hard to reach areas.
Brushing is a good way to get into all the crevices, but it can be hard on the leather if you don’t use something like saddle soap or water-based cleaner that won’t damage it. If you’re only using regular dish soap then make sure there are no harsh chemicals in it or else those chemicals will end up harming the leather too!
If your boots are made out of synthetic materials (like Goretex), then using regular dish soap will work just fine for getting rid of dirt and grime without damaging any underlying stitching or seams in which case I would recommend using hot water + baking soda as this combination helps remove stains from both synthetic material AND leather alike; however if possible try not using anything abrasive since these types tend towards being quite stiff when wet so avoid rubbing them against each other too much instead try gently wiping off excess moisture instead until dry completely before putting back into shoes themselves.
Step 4. Treating waterproof and breathable fabrics.

Most quality hiking boots have been pre-treated with waterproof product and or made with waterproof material like Gortex. If, however, you have had your hiking boots for some time and used them quite a bit they could start to lose the waterproof attributes they once had.
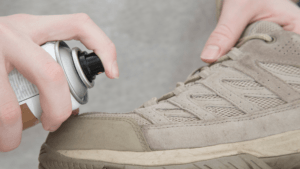
If this starts to happen either from poor care or just excessive use, it could be time to treat them with waterproofing material depending on what they boots are made with. If breathable fabric there are sprays that are waterproof and absorb into the material to repel water once dried.
Other material like Leather would need to be treated with waterproofing wax like Nikwax. Whatever you use, make sure it is ok for the material your boots are made out of so that it doesn’t damage them. Refer to the manufacturers directions on the tongue of the boots or on their websites for care instructions.
Dry it out.
One mistake many hikers make is to try to wear their hiking boots while still damp. There are a couple important reasons why this is not something you should do.
First, wet or damp hiking boots lowers their structural integrity and makes them more susceptible to wear and tear and faster degradation.
Second and more importantly it is for your own health and safety. Especially important for hikers you want to make sure your feet stay warm and dry. Cold, wet feet are cause for blisters, infections, and sickness. All the things that you do not want on a hike or backpacking trip.
I understand that it takes a while for boots to dry, but that extra time you wait could be the difference of a healthy hiker and healthy boots and not.
Stains!
If you’ve got stains on your hiking boots, don’t worry! You can clean them with a solution of warm water and soap without getting water inside your shoes. Then use a brush made specifically for cleaning footwear to scrub the dirt away from the insoles and outsole before washing them again in warm water with Nikwax Nubuck and Suede Proof, a waterproofer and stain repellent.
You spray it onto the surface of your boots before allowing it to penetrate for 15 minutes before wiping off any excess with a damp cloth. If there are still stains left behind after using this product, repeat these steps until they’re gone completely
Make sure everything is dry before putting them back on and getting back out on the trail!
Step 5. Storing your hiking boots
Once your hiking boots are clean and dry, it’s important to store them properly to prevent damage.

First and foremost, never store your hiking boots in direct sunlight as this can cause the materials to break down prematurely. Secondly, avoid storing your boots in a damp location as this can encourage mold and mildew growth.
If possible, store your hiking boots in a cool and dry location such as a closet or storage bin. If you live in an area with high humidity levels, consider placing desiccant packets inside your storage container to absorb excess moisture and prevent moisture damage.
Finally, make sure your storage container is large enough so that your boots aren’t crammed together; this will help prevent creasing and premature wear-and-tear.
How to clean hiking boots summary
Keeping hiking shoes clean will help keep them functional for longer. For instance leather is durable, but it’s not impervious to the elements. If you’re going on a hike or a walk in the woods, every step can take your shoes away from their original condition. Dirt and mud will stick to them—and if they get dirty enough, they might crack open! That’s why keeping your boots clean is so important: it prevents this damage from happening in the first place and keeps things in tip-top shape.
Keeping waterproofing materials like Gore-Tex® waterproof breathable membrane technology (BRT) membranes applied directly onto the interior polyurethane material used on many hiking boots helps keep moisture out of these areas better than most other types of footwear available today. “

Colorado Trail: 10 Latest Updates, In-Depth Resources, and Powerful Guides to Feel Confident on The Trail
Conclusion
Now that you know how to clean hiking boots, it’s time to put this knowledge into practice! Grab your supplies and get started. In no time at all, your shoes will be looking and smelling as good as new.
By following these simple tips on how to prepare your hiking boots for lasting use, you’ll be able to enjoy many years (and many miles) of outdoor adventure without having to replace your trusty footwear prematurely.
So get out there and explore – your hike awaits!
Best Hiking Boots of 2022 – https://www.outdoorgearlab.com/topics/shoes-and-boots/best-hiking-boots


